RangeeOS - Installation von einem USB-Stick
Dieses HowTo beschreibt, wie Sie aus einer ISO-Datei einen bootfähigen USB-Stick für die Installation von RangeeOS erstellen können.
Zusätzlich zur ISO-Datei benötigen Sie ein Tool, um daraus einen bootfähigen USB-Stick zu erstellen. In diesem Artikel finden Sie Anleitungen für Rufus, UNetbootin und Ventoy.
- Schritt 1 – Bereitstellen eines USB-Sticks
- Schritt 2 – Installation auf dem Thin Client
- Schritt 3 – Ersteinrichtung
Schritt 1 – Bereitstellen eines USB-Sticks
Formatieren Sie Ihren USB-Stick zunächst mit dem Dateisystem FAT32. Unter Windows klicken Sie dazu mit der rechten Maustaste auf den USB-Stick und wählen Formatieren…. Wählen Sie anschließend bei „Dateisystem:“ die Option FAT32 (Standard) und aktivieren Sie die Schnellformatierung.
Zum Übertragen des ISO-Images auf den USB-Stick können Sie Tools wie Rufus, UNetbootin oder Ventoy nutzen.
Vorgehen mit Rufus
- Stecken Sie den USB-Stick in einen Windows-Desktop oder -Laptop.
- Starten Sie Rufus.
- Wählen Sie unter Abbild die heruntergeladene ISO-Datei aus.
- Wählen Sie bei Laufwerk Ihren USB-Stick.
- Klicken Sie auf Start.
- Bestätigen Sie anschließend mit OK.
- Warten Sie, bis der Vorgang abgeschlossen ist, und werfen Sie den USB-Stick sicher aus.
Vorgehen mit UNetbootin
- Stecken Sie den USB-Stick in einen Windows-Desktop oder -Laptop.
- Starten Sie UNetbootin.
- Wählen Sie unter Abbild die heruntergeladene ISO-Datei aus.
- Wählen Sie bei Laufwerk Ihren USB-Stick.
- Klicken Sie anschließend auf OK.
- Warten Sie, bis der Vorgang abgeschlossen ist, und werfen Sie den USB-Stick sicher aus.
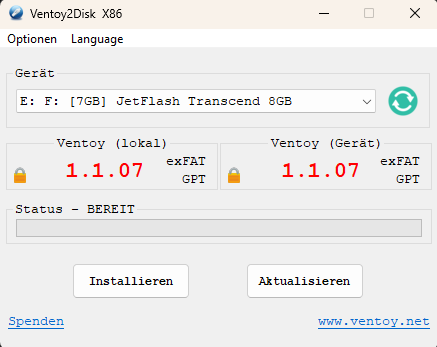
Vorgehen mit Ventoy
- Stecken Sie den USB-Stick in einen Windows-Desktop oder -Laptop.
- Starten Sie Ventoy2Disk.exe.
- Wählen Sie unter Gerät Ihren USB-Stick.
- Klicken Sie auf Installieren und bestätigen Sie zweimal mit Ja.
- Nach der Installation erhalten Sie die Meldung, dass Ventoy erfolgreich installiert wurde.
- Unter Ventoy (Gerät) sollte nun die gleiche Version angezeigt werden wie unter Ventoy (lokal).
- Kopieren Sie anschließend die ISO-Datei auf den USB-Stick und werfen Sie ihn sicher aus.
Schritt 2 – Installation auf dem Thin Client
Stecken Sie den USB-Stick in Ihren Thin Client und starten Sie das Gerät. Drücken Sie während des Starts wiederholt die Taste für das Bootmenü oder das BIOS. Die Taste variiert je nach Gerät und befindet sich häufig auf Entf , F2 , ESC , F9 , F11 oder F12 .
Booten Sie vom USB-Stick, wählen Sie im Menü „Install RangeeOS“ und folgen Sie den Dialogen.
Nach Abschluss der Installation starten Sie das Gerät über die Option „Reboot“ neu.
Schritt 3 – Ersteinrichtung
Nach dem Neustart beginnt die Ersteinrichtung. Hier können Sie bereits Netzwerkeinstellungen vornehmen und Verbindungen anlegen. Nach Abschluss startet der Thin Client neu. Alle weiteren Einstellungen können Sie anschließend über die Kommbox vornehmen. Der Standardbenutzer lautet „administrator“, das Passwort „engels“.
Weitere Informationen zur Konfiguration und Einrichtung von RangeeOS finden Sie im aktuellen Handbuch.
Bei Problemen oder Fragen können Sie sich jederzeit an das Rangee Support-Team wenden – entweder über das Supportformular oder per E-Mail an support@rangee.com.
Nach der Ersteinrichtung verbindet sich das System mit dem Rangee Lizenzserver. Falls dem Gerät noch keine Lizenz zugewiesen wurde, erhält es automatisch eine voll funktionsfähige 30-Tage-Demo-Lizenz. In den letzten zehn Tagen vor Ablauf erfolgt eine Warnung, und die Lizenz kann jederzeit auf eine Lifetime- oder Subscription-Lizenz erweitert werden.
Mehr Informationen zur Lizenzierung: Rangee Lizenzierung